Improve fastening 3D printed components with threaded inserts
Rapid Prototyping – Augmented
Fastening 3D printed components presents a frustrating challenge. While we can print threads directly as a feature of parts, the resolution of the thread and the strength of the threads make printing seldom viable. We can bond parts, but that loses replaceability or maintenance. Self-tapping screws can work effectively as well, but often the materials used in 3D printing can crack under installation stresses. Fortunately, there is another option: installing metal inserts. In this blog I discuss a variety of commonly used threaded inserts.
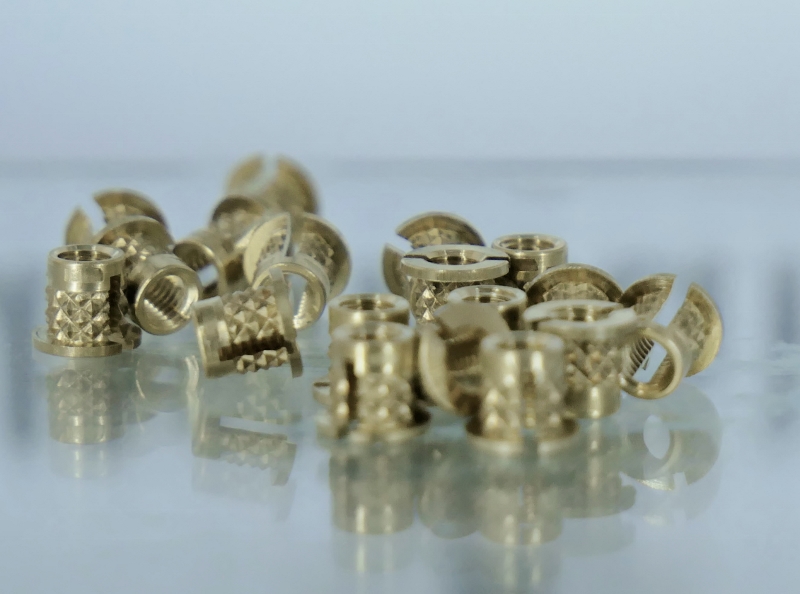
Threaded inserts are metal rings with retention features on their outer surface. They come in many varieties to create threads in virtually any material, from plastics to hard metals. Focusing on plastics though, there are three main types: press-in inserts, heat set inserts, and molded-in inserts. Another common option for softer metals and thermoplastics is self-tapping inserts, although 3D printed materials are generally too brittle to fully take advantage of these inserts.
Before diving into their differences, it’s important to understand the considerations in evaluating an insert’s performance. Their main performance metrics are pull-out force and torque resistance. Pull-out force represents the force required to remove the insert from the plastic. Torque resistance represents the torque required to deform the plastic to the point where the insert spins freely – similar to stripping threads. The geometry of the retention features plays a large role in determining these metrics. Inserts can be optimized for one or the other, depending on application. More commonly though, inserts are optimized for a balance of torque-out and pull-out.
Press-in inserts are the most economical inserts and represent the simplest and most versatile way to thread plastics. They work with both thermoplastics and thermosets and require little extra equipment. There are three types of press inserts: Cold press inserts require an arbor press to be installed. Self-threading inserts cut material as they are installed. And expansion inserts can be pushed in with much less force, but expand when a fastener is used.
Cold press inserts plastically deform the material surrounding them as they’re pressed in. These inserts are good for torque resistance, but pull out force is less than that of self-threaded inserts. Conversely, self-threading inserts have a male thread on the outside of the insert and cut the material as it is installed. Self threading inserts have good pull-out strength, but lower torque resistance. Expansion inserts slide more easily into their hole. But they bite into the material as a fastener is installed, like a drywall anchor. These have reasonable pull out and torque retention but require larger bosses to handle the stress of the expansion.
Heat set and ultrasonic inserts offer a middle ground between molded-in and press-in inserts. They offer similar performance to molded-in inserts with the advantage that they don’t slow down the production process (moulded-in inserts need to be loaded into the machine each time). They both melt the surrounding plastic to insert themselves. After insertion, the plastic cools and solidifies around the insert. This allows the plastic to flow between the insert’s retaining grooves and ridges. Because they melt the plastic surrounding them, they only work with thermoplastics. These methods of installing the inserts may not be possible because not all 3D printed parts are thermoplastics.
Heat set inserts, by virtue of their name, use a heated element to heat the insert which melts the material surrounding it. Although there are specialized tips to heat the inserts, a regular soldering iron tip can be used in a pinch. The material flows around the insert, which makes them a higher performance substitute to press fit inserts. There are disadvantages; if there isn’t a heated press available, it’s tough to keep the insert straight during installation. This can lead to tolerance errors. Set the iron’s temperature to 70% between the glass transition (Tg) and the melt temperature. This will ensure that you don’t burn the plastic or melt unnecessary material.
Ultrasonic inserts use a press that vibrates at a high frequency to push the insert in. The high frequency vibration causes friction between the insert and the plastic, melting the surrounding plastic. Once the insert is installed to its correct depth, the plastic is left to set, freezing the insert in place. This method is mostly used in higher volume production as ultrasonic presses are not common, requiring significant tooling and setup time with tighter production controls.
Molded-in inserts offer the best performance without compromising on versatility of materials. As the name suggests, they are only possible in molded parts like injection moulding or cast urethanes. They are placed into the tool before each moulding cycle. The plastic forms around the insert during the moulding process. These can be economical in higher volume production and are sometimes used for low volumes prototype runs when 3D printing isn’t an option.
Regardless of the type of insert you use, threaded inserts are an inexpensive and simple way to increase the usability and replaceability of your 3D printed prototypes. They also have the advantage of increasing their production value by giving a more professional, thought out look. For additional information, check out these online resources: Four Ways to Tackle Threaded Inserts for Plastics and Inserting Hardware Post-Build
Andrew Zavorotny is a Mechanical Engineering Co-op at StarFish Medical who dabbles with sounding rockets on the side. His primary engineering interests are in rapid prototyping and bio-inspired materials. Andrew’s goal is to provide novel, creative solutions that measurably improve everyday life in a sustainable fashion. This is his debut blog for StarFish Medical.