4 ways to make your jig design process more effective
Jigs are used quite heavily in research and development. They make our lives easier and help us conduct tests and collect data when needed. Here are 4 ways to make your jig design process more effective along with related principles to keep in mind as a new jig developer.
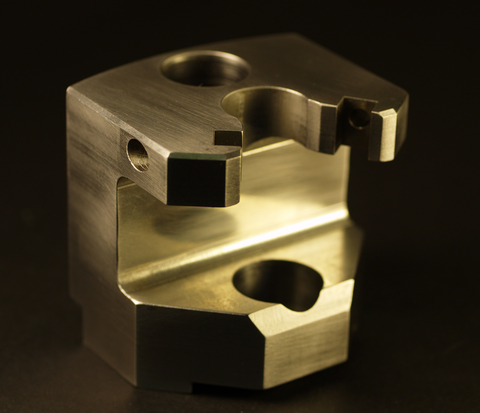
Don’t make it pretty, the whole point of a jig is functionality
First ask yourself, “What is the purpose of this jig?” Whether it is required for exploration or for repeated tests or assembling components, design for manufacturing should always be in the back of your mind. Keep it simple to keep costs down without compromising functionality.
What does that mean? When there isn’t a need for something, such as a counterbore or the use of a bottoming tap, it is best to leave it out. I find myself thinking, “is this feature essential to the functionality of the jig?” This helps weed out unnecessary aesthetically pleasing elements which merely increase costs.
In the case of an exploration jig, keeping it simple is best. Avoid wasting both time and resources. If it must be highly robust for repeatability studies, a few additional operations for machining or taking time with material selection and post processing, may be worthwhile and should definitely be considered.
Think manufacturing
Just like any other part or assembly, how you are going to make the jig should be considered. This is heavily dependent on the purpose of the jig and the level of accuracy that is required. It should be thought out quite early on.
Does the jig need to withstand any kinds of extreme temperatures? What kinds of tolerances are required on machined or 3D printed components? Will the jig get wet? Ask yourself these questions to determine material and fabrication processes.
Plan out the set-up, make it quick
The purpose of a jig is to be able to test components quickly and accurately. The jig is merely a tool to collect data without having any influence on the results. Consequently, it is important to think about setting up the jig at the design stage.
What is the best way to assemble and operate the jig without it having any effect on results, yet keeping the architecture simple? A little extra time for initial assembly of the jig is acceptable if later on it is easier to collect results. Quick, easy operation of the jig is essential to producing accurate results as well as conserving time– especially if the jig is to be used for several tests in close succession. Once again, if this requires a few additional features, it is worth it in the long run.
That being said, if off-the-shelf components can be used for assembly purposes or in place of fabricated parts, they could be a way to reduce cost without affecting parts that are essential to ease of use of the jig.
Another time saver for setting up the jig is to add a visible revision number on the parts. This helps quickly identify the correct parts during assembly.
Think long-term expandability
Although the reoccurring theme in this blog is “keep it simple,” in some cases, a bit of forward thinking can go a long way. It can become a big time and money saver as well.
Take a bit of time to see whether the jig could be slightly altered, or include small enhancements, to test for additional variables or scenarios. Design the jig to be as flexible as possible, while keeping the functionality intact. That is always a bonus.
Jig design is often seen as a straightforward process, and many regard it as trivial; however, there are a lot of things to keep in mind and many ways to be more efficient in the design process. Especially for beginners, looking at the design from different angles helps to cover all grounds thoroughly.
Saakshi Suturwala wrote this blog while a StarFish Mechanical Engineering summer intern. She is a 4th year Biomedical Mechanical Engineering student from the University of Ottawa. Saakshi recently built a voice-activated prosthetic forearm as a personal project. She is one to watch!
Image: 2754326 © Dallasphotography / Dreamstime.com