Tolerancing is often an essential step in understanding the manufacturing/assembly requirements of an optical system designed for use in medical devices. The use of optical design software for tolerancing simulations is a valuable tool for identifying the specific manufacturing/alignment errors that can be allowed and their limits.
Zemax OpticStudio® is a popular optical design software that can facilitate the design of optical medical devices. The software includes a versatile tool for simulating the effects of tolerance errors on the performance of an optical system. In this blog, we give a basic overview of tolerancing in Zemax OpticStudio’s sequential mode.\
Engineering tolerances define how much room there is for error in the manufacturing of a part or assembly. Tolerancing is an important part of optical design for medical devices. Optical systems, such as lens stacks, can be very sensitive even to small manufacturing errors. These could include errors in the manufacturing of an optical element, such as deviations from the ideal shape of a lens, as well as errors in assembly, such as positional or angular error in the location/orientation of a mounted optic. It’s often necessary to investigate the acceptable tolerances when developing an optical system, to ensure that the system is manufacturable and to understand which are the most critical tolerances.
Zemax OpticStudio® includes tools for simulating manufacturing/assembly errors within defined tolerance limits. OpticStudio’s tolerancing tool uses a Monte Carlo method, in which many variations of the designed system are simulated with various surface or alignment errors, and each variation’s performance is assessed according to some defined criteria. By doing such a simulation on a large number of variations of the system, the impact of various alignment/surface parameters on the performance of the system can be assessed. Additionally, the combined impact of the tolerance errors is described statistically, so the expected performance for various percentiles of manufactured devices can be assessed.
Defining Parameters
The first step in tolerancing a designed system in OpticStudio is to define the parameters and tolerance limits to be investigated.
In the software’s sequential mode (in which each optical surface in a designed element or assembly is defined in reference to the previous surface), the tolerance limits can be defined for various predefined parameters. These include indices of refraction, Abbe number, radii of curvatures, decentration of surfaces/elements, tilt of surfaces/elements, thicknesses of materials/air gaps, and the magnitude of surface irregularities (i.e., deviations from the ideal form of the surface). The user can also define other parameters of their design for tolerancing (for example, variations in the conic parameter of an aspheric optical surface).
The most common parameters to be toleranced and their limits can be defined using OpticStudio’s Tolerance Wizard. The parameters that can be defined through the Tolerance Wizard are shown below:
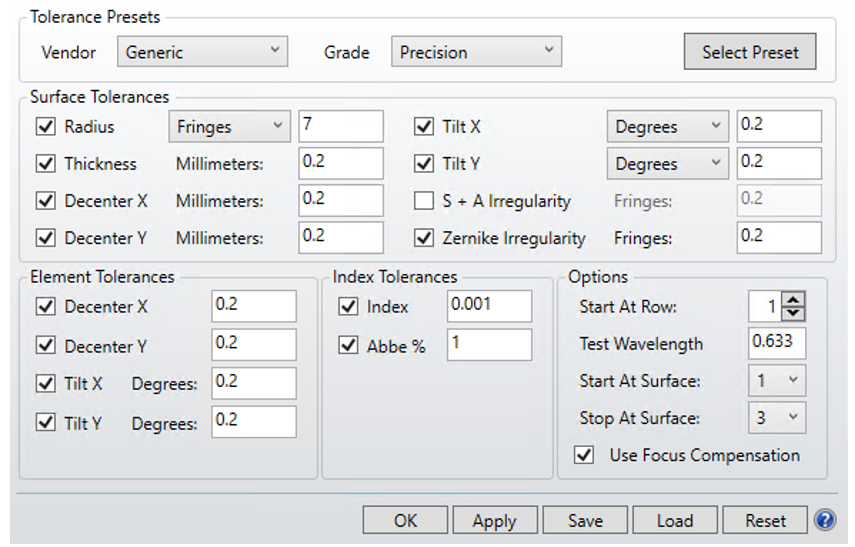
Note also the “options” box which allows the user to define the model surfaces to include in the tolerance analysis. The user can also define a test wavelength which relates to a common interferometric method of assessing the accuracy of a manufactured optical surface. The definition of some tolerance limits in “fringes” also relates to this method; a brief overview of the method can be found here.
Another important option is “Use Focus Compensation” which allows the image plane to be moved axially for each simulated variation of the system to optimize the focus at the image plane. This option can be thought of as corresponding to a compensation step in manufacturing in which the focus of a manufactured system is “dialed in” by allowing the axial distance of the image plane (for example, the location of a camera sensor relative to a lens) to be adjusted slightly after the system has been constructed.
Outside of the Tolerance Wizard, the “Tolerance Data Editor” can be used to define less common tolerancing parameters. Additionally, parameters other than the axial distance of the image plane can be defined in the same editor as additional compensators to be varied to improve the focus.
Performance Criteria
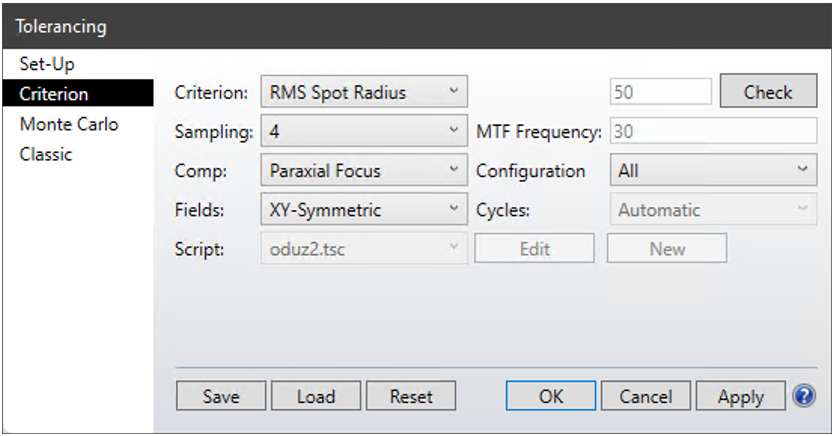
For OpticStudio to assess the performance of each variation of the designed system, a performance criterion must be defined. This definition is done in the tolerancing tool prior to starting Monte Carlo simulations. Some common examples of performance criteria include the RMS spot size (i.e., the root-mean-squared spot size that light from a point-like source focuses into at the image plane) and the modulation transfer function (MTF) at a user-defined frequency (a measure of the degree to which contrast in a focused image can be maintained by an imaging system for a given spatial frequency). A used-defined merit function, which may be a combination of multiple weighted criteria, can also be used. The same merit function is also used for defining performance criteria when using OpticStudio’s optimization tool.
Several other settings for performance criteria are also available. The user has the option of increasing or decreasing the number of rays used in the tolerancing simulation (“Sampling”), with lower numbers being faster but less accurate and vice versa. The user can also choose which parameters to vary for focus compensation (axial focus only, all user defined compensators, or no compensators) and which optimization method to use for the compensators (“Comp”; “Cycles” defines how many cycles to run in optimizing the focus compensation). If the designed system has multiple configurations, the user can define which configuration(s) are to be toleranced (“Configuration”). Finally, the user can define which of the defined field points to be assessed in tolerancing and with what symmetry about the optic axis (“Fields”).
Tolerancing Setup
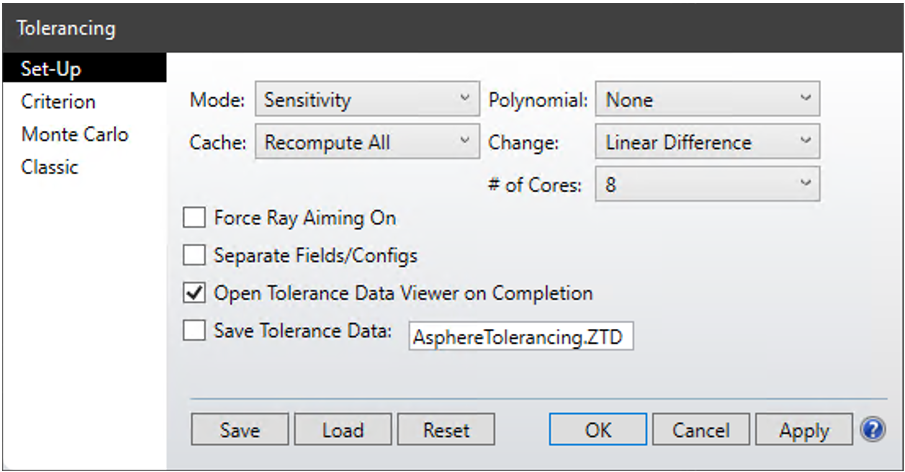
A number of different modes are available for assessing how the performance criteria vary with each tolerance parameter. For example, the “sensitivity” mode computes the change in the performance criteria at the each of the defined tolerance limits. We will use this mode below – details of the other modes can be found in OpticStudio’s help system. The polynomial option allows for the sensitivity to be assessed at multiple values of the tolerance parameters and fit with a 3rd or 5th order polynomial, which can be used to speed up subsequent sensitivity analyses when some of the tolerance values are changed, via the “Cache” options.
Several other options are included: The user can define how changes in the performance criteria are calculated (“Change”); either as a linear change in the nominal criterion value, or as a root-sum-squared difference. The user can force ray-aiming (an iterative method used by Zemax to ensure that that the simulated rays precisely fill the system’s stop surface) to be used when evaluating the tolerances. Finally, the user can choose to evaluate changes in the performance criteria for each of the system’s fields and configurations individually, whereas the changes over all fields and configurations are calculated as an average otherwise.
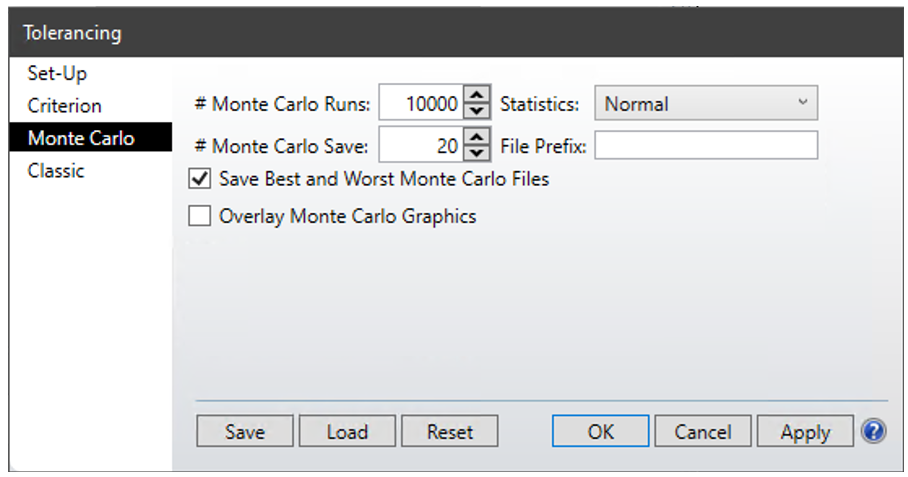
The Monte Carlo tab allows the user to set the number of variations of the system to test in the tolerancing simulation, along with the statistical distribution to be used in reporting results. The user can also define how many of the variated systems to save for analysis, and has the option to save the best and worst systems tested, per the defined performance criteria. Finally, the “Overlay Monte Carlo Graphics” option overlays analysis results for each of the variated systems on each of the open analysis windows (e.g., the standard spot diagram) which can be useful for understanding the impact of tolerance errors on various performance metrics.
Example: A Simple Asphere
Consider the example of a simple custom asphere used to image object under monochromatic illumination at a given distance over a small field-of-view. Two field points have been defined, one on the optic axis and one 0.5 mm above the optic axis. The asphere surface’s parameters (radius of curvature, conic, and 4th and 6th order asphere terms) have been optimized to minimize the average focused spot size over all fields. We will run a tolerance analysis on this system, using the tolerance parameters and limits, criterion, and settings shown in the figures above. The optimized asphere is shown below.

Upon completion of the tolerancing simulation, OpticStudio returns the tolerancing data along with a summary report. The summary includes sensitivity analysis, showing how the performance criteria value (in this case, the mean RMS spot size of all simulated fields in millimeters) is impacted by each individual tolerance parameter, along with identification of the most impactful performance parameters, which are shown below (Figure 6).
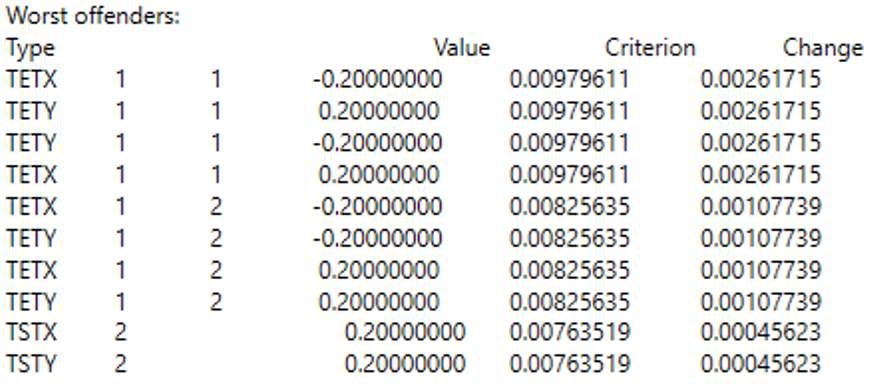
For each of these parameters (listed by their tolerancing operand code), the change in the performance criterion and the resulting criterion value are shown. The most impactful parameters out of those tested are the tilts of the aspherical surface about the X and Y axes varied by both negative and positive angles (TETX and TETY; the two numbers after the operands refer to the first and last surfaces tilted, which may be a single surface, or several surfaces corresponding to an element or group of elements).
The summary also shows various statistical measures of the performance of the simulated, toleranced systems (Figure 7). The best, worst, mean, and standard deviation in terms of the performance criteria value for the simulated systems are given, along with performance met by various percentiles of the simulated systems.
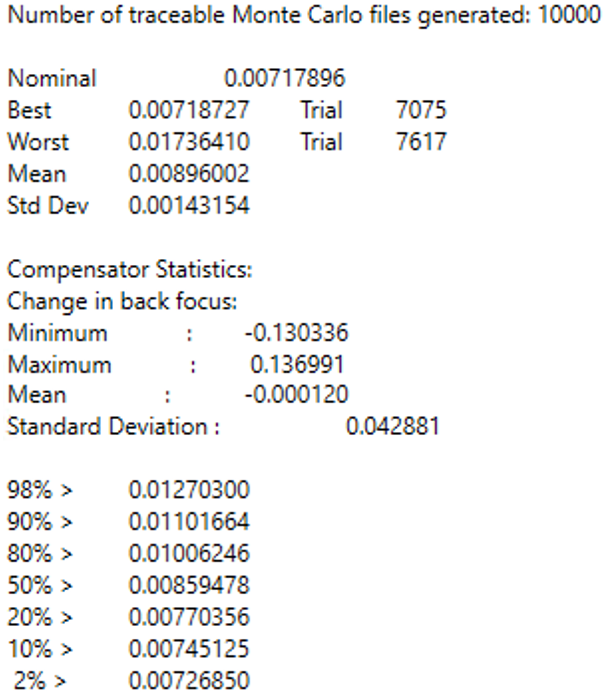
If the requisite performance metrics are known, these metrics can be used to assess what percentage of assembled systems are likely to meet the required performance. For example, if the asphere is imaging onto a camera sensor, the designer might require that the RMS spot size is no greater than some multiple of the pixel size. The designer can then look at the percent yield that would be expected to meet that performance, based on the statistics shown. If the yield is found to be unacceptable, the designer may seek to tighten some of the tolerances for manufacturing, particularly those found to be the most impactful. On the other hand, if the tolerances are found to be much tighter than is necessary, the designer may loosen some tolerances if doing so reduces manufacturing cost or cycle time.
Note that, because a focus compensation was allowed, manufacturing of this system would need to involve a step where the focus is “dialed in” and/or an adjuster would be needed in the final system in order to achieve the performances simulated. Looking at the compensator statistics, it is expected that the focal plane location can vary by up to ~±0.140 mm, or about 0.6% of the distance from the back surface of the lens to the focal plane (nominally, 25 mm).
A More Intuitive View
In general, a well-defined quantitative performance criterion should be used to ensure that a toleranced manufactured system will meet the performance required for its application. With that in mind, we can also get a more intuitive picture of the effects of tolerance errors by running analyses on the systems saved during the Monte Carlo simulation.
As an example, consider the use of the designed asphere for imaging an object 1 mm in width. Using OpticStudio’s Geometric Image Analysis feature, we can simulate the resultant image in our nominal system, as well as in some of the systems saved during the Monte Carlo simulation, such as the worst-performing system. Here we simulate the imaging of a 1 mm tall monochromatic letter “F”. Note that the image is demagnified compared to the object as the image distance is smaller than the object distance. The resultant image for the nominal and worst performing systems are shown.
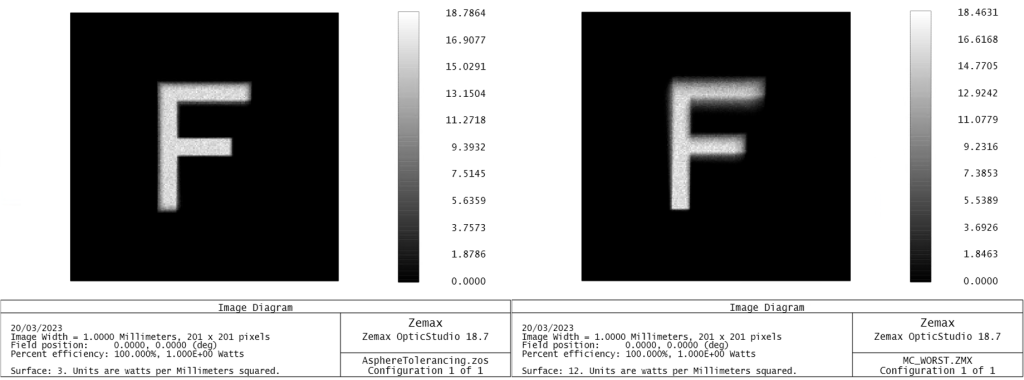
We see that the image formed by the worst performing system is significantly blurred compared to that of the nominal system, but not enough for the letter to be illegible. If the (somewhat unrealistic) application of the lens system is simply to legibly image 1 mm tall high-contrast monochromatic text onto a detector and the quantitative details are not important, we can conclude that the specified tolerance limits are likely to be adequate.
Summary
In this blog, we have given a basic overview of the tolerancing tool in Zemax OpticStudio’s sequential mode. This tool simulates the effects on the performance of a designed optical system when its alignment and/or manufacturing parameters are varied within defined tolerance limits. The sensitivity of the system to specific parameters can then be assessed, along with statistical measures the expected performance of many assembled systems.
Images: StarFish Medical
Ryan Field is an Optical Engineer at StarFish Medical. Ryan holds a PhD in Physics from the University of Toronto. As a post doctoral fellow, he worked on the development of high-power picosecond infrared laser systems for surgical applications as well as a spectrometer from home materials.