

Writing Effective SOPs for Manufacturing Medical Devices
TL;DR
Medical device manufacturers are required by ISO 13485 and the FDA to document manufacturing processes in SOPs, yet poorly written procedures remain one of the most common sources of warning letter citations:
- Effective SOPs follow a seven-step process spanning planning, investigation, organizing, drafting, revision, validation, and ongoing maintenance, with a designated Procedure Owner accountable at every stage.
- Format and language choices matter as much as content: active voice, low cognitive load, clear responsibilities, and visual aids like flowcharts and T-bar tables reduce the risk of user error and inconsistent execution.
- An SOP is only as good as its adoption; procedures that are hard to follow will not be written, followed, or maintained, which defeats the quality system they are meant to support.
What is a Standard Operating Procedure? And why do I need one?
Writing and implementing standard operating procedures (SOPs) for the manufacture of medical devices is required by ISO 13485, FDA, and other regulatory bodies. An SOP is a set of written instructions that documents a routine or repetitive activity that is followed by employees in an organization. The development and use of SOPs are integral parts of a successful quality system. They provide directions to perform a job properly and consistently to achieve predetermined specifications and quality end results. SOPs address all requirements to complete the job or process safely and effectively.
Properly documented manufacturing SOPs are imperative for medical device companies, especially for preventing any future situations that could warrant an inspectional observation. Poorly written manufacturing SOPs are one of the most common causes of deficiencies and observations cited in warning letters from the FDA.
Here are common issues with procedures listed in FDA warning letters(1):
- Failure to maintain or follow written operating procedures
- SOP xxx is incomplete
- Failure to develop, maintain and implement written xxx procedures
- The procedure does not establish XXX
- There are no instructions
- The procedure does not identify who
- The procedure does not describe how
- There is no evidence your firms’ procedures have been implemented
- Failure to follow written responsibilities and procedures
- Failure to develop adequate written procedures
- A review of the xxx procedure lacked a requirement or details
- Your firm failed to establish and maintain procedures
- Procedures for xxx have not been established
It is better to invest time and effort in the design process of a procedure than investing remedial efforts in the process of investigations.
This guide will help you make manufacturing SOPs that are easy to follow by using best practices for SOP structure. First, apply the recommendations below for SOP content authoring. Then assess your process to confirm you are using best industry practices. This will ensure you get the results you want.
Let’s get started…
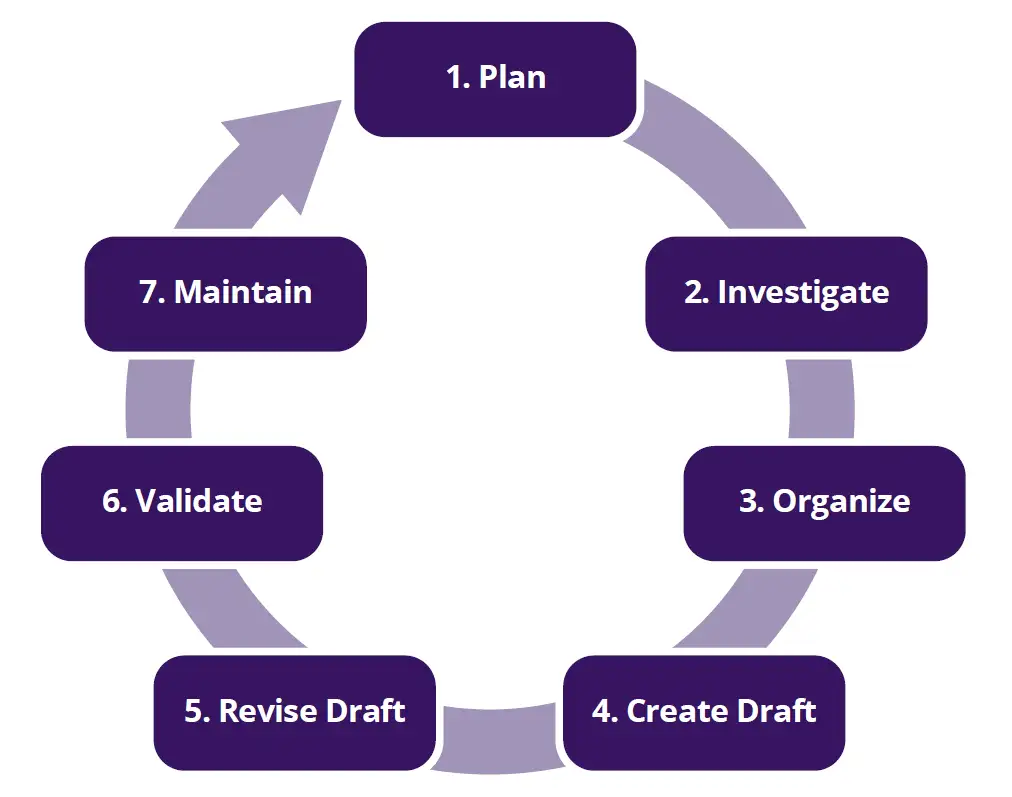
Figure 1. Seven steps to write an effective SOP
Step 1: Plan
Before you dive into collecting content and worrying about formatting, you need a Working Plan for your procedure (Figure 1). Start by asking a series of questions – is a new procedure needed? If there is a written procedure, is it correct? Easy to follow? Up to date? Complete? Is this process composed of multiple tasks, and are those tasks required to be executed in a certain order? Is the process result measurable?
Who is going to use this procedure? Will it be used by multiple personnel? Multiple departments? Will it be used in multiple areas? Different sites or locales? Asking questions will help you to map out your new process or determine what’s wrong with your existing procedure and clarify the steps in the process.
Content Tip:
- DO assess whether a medical device manufacturing SOP is needed – use a SIPOC (Suppliers, Inputs, Process, Outputs and Customers) Diagram (see Figure 2) to help you to define the number of steps/procedures required
- DON’T parse out the process into multiple procedures unless necessary
- If necessary, DO be smart about how it is done
- DON’T duplicate content from other SOPs or create redundant SOPs
Step 2: Investigate
Now that you have asked the initial questions to develop your Working Plan, you need to dig deeper and ask more questions. There are two complementary paths to follow on this investigation – conducting interviews and having a scavenger hunt!
Interview
Interview the people who are either involved with, or affected by, the procedure. Interview designers, users and clients and ask for their input into the procedure. You may want to develop an interview guide and/or an official form to document these interviews. Get familiarized with the processes, equipment, materials, tools, chemical substances, regulatory requirements, safety requirements, specifications, sites, systems, clients, and any other details to get a complete picture of the process.
Locate
Next, locate the design, technical, and safety information for the process, including the site(s), equipment, and tools. Collect information from validation protocols, drawings, user manuals and manufacturers’ specifications, covering both equipment and operating parameters, ranges, and limits.
After this investigation step is completed, you can begin to organize your content.
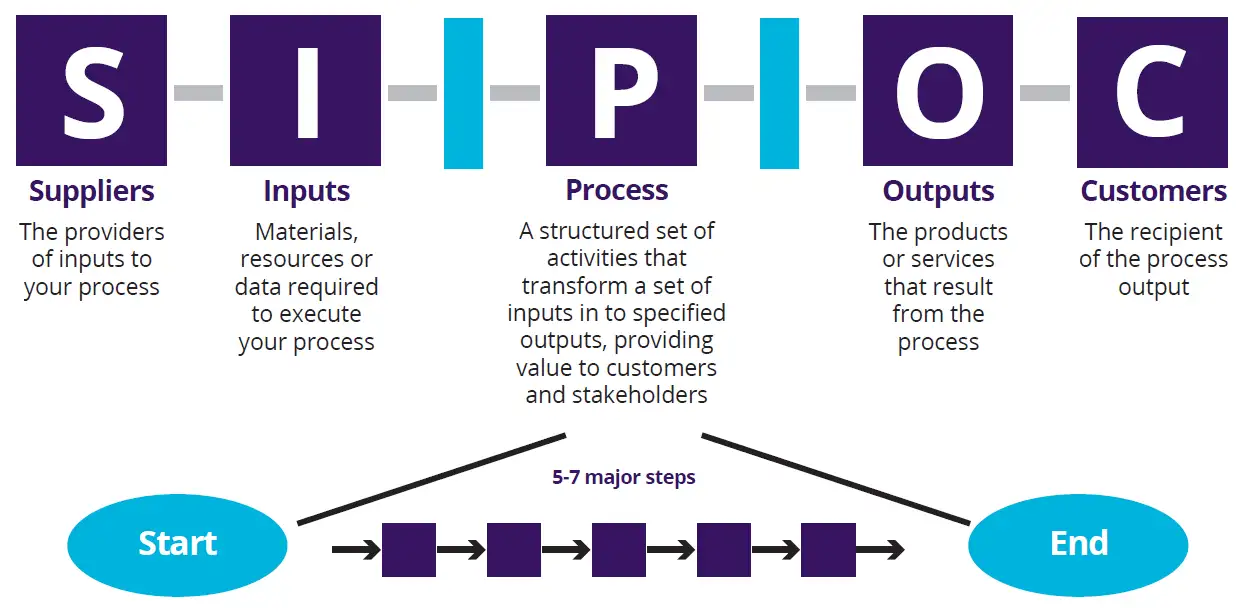
Figure 2. SIPOC Diagram
Step 3: Organize
Once the Working Plan is completed, it is time to analyze and organize your information. Evaluate any existing procedures and determine how many procedures are needed. You will need to identify the Procedure Owner (described below), the supporting personnel (subject matter experts [SMEs], operators, technical experts [Product Development, Manufacturing, Quality Assurance, etc.]) and the procedure author (should be someone with technical writing capability).
Create a team to do a ‘What If’ analysis. What if I do more? What if I do less? What if I don’t do anything ‘x’? This helps determine the critical steps and will highlight any potential consequences.
Procedure Owner
Every procedure should have a Procedure Owner. The owner provides subject matter expertise and describes the process inputs and outputs. They determine connections to other processes and communicate with the necessary stakeholders. They have authority, responsibility, and ability to define metrics for process monitoring and performance. They provide training on the process and ensure that records document the effectiveness of the process and can withstand regulatory scrutiny.
After you’ve identified your Procedure Owner, you can start to create the draft procedure.
Step 4: Create Draft
Use the information collected on the previous steps to create your first draft. Confirm your support from the SMEs, operators, and other users, for ongoing consultation during the writing process. Check what else you need to initiate the procedure draft such as forms, templates, and document and/or change control systems.
Best practices for creating error-proof and effective SOPs are covered below in detail.
Map Out the Process
Outline the main steps of a task and its subtasks. Use Post-it notes or digital equivalents to lay out your process; map out what you are doing. Flesh it out with enough detail to do the process consistently. Your goal is to provide a single function that contributes to the overall objective of the task. This task can then be accomplished by an experienced operator with no further explanation.
The task may have several implied sub-steps, such as:
- Step: Purge line with water
- Sub-step: Push reset button
- Sub-step: Charge raw materials
Make sure to include “How”, “What”, and Where” details:
- Where is “it” done? Outside, upstairs, control room
- How will I know “it” when I see “it”? Size, color, label, number, landmark
- Exactly what should I do to “it”? Turn it, press it, pull it, dump it, hold it, flip it
- How can I tell I did “it” right/wrong? Sound, alarm, vibration, amount indicated, gauge indication, color change, fluid level reached, etc.
For critical steps, include “Why” details:
- Why must I do “it”? Will anything go wrong if I skip “it”?
- Why shouldn’t I do “it” in this order? Will anything go wrong if I do it before the previous step?
- Why can’t I do “it” a different way? Could anything go wrong if I:
- Do more or less of “it”
- Use a device other than “it”
- Accomplish “it” by a different method
Avoid excess wording or a complex writing structure – do not use large blocks of text. It is best to not include too much detail or information; details can tie your hands if too specific (i.e., use the ‘Dell’ computer versus use the computer). You can always provide more background information or explanation during training.
Standard Procedural Elements and Sections
As a best practice, all procedures should include the following:
- Title, revision designation, effective date
- Table of Contents
- Purpose
- Scope
- References
- Responsibilities
- Glossary (definitions and abbreviations)
- Procedure
- Revision History
- Approvals
The following should be included as appropriate, based upon content or what the procedure is defining:
- Materials and Equipment
- Safety Information
- Forms/Documentation
- Attachments (i.e., examples, flowcharts/decision trees, matrices, etc.)
Remember to provide enough space to write on forms and include samples of correctly completed forms as a reference in the Attachments section.
Style Format
Make your procedures easy to read and to follow by defining a standard format for each document type. The format should call out important items (such as safety warnings, information entry and signature areas) so they are not missed.
The following formatting items make the procedure easier to navigate:
- The title of the procedure is the largest item on the page
- The procedure title is clear, consistent with other titles and uniquely describes the topic
- Use of font: Arial or Times New Roman
- Type size is 12-point font or larger
- Line spacing – Use 1.5 to 2.0 spacing
- Indentations – Usually 5 space indentation is sufficient
- Margins – Use 1.5-inch left margin and 1-inch right margin. Use 1 inch top and bottom margins
- Provide page numbers as well as section numbers
- Section titles are bold or larger (14-point) than the text font; sections have clear endings
- Include hyperlinks to sections and definitions
- Do not number sections and subsection titles, numbers are intended for STEPS only; you can use letters to distinguish between sections or subsections
- Step number (single level of number used). Avoid outline styles. Extra numbers at 3rd and 4th levels do not really give users information that can help their performance
- The document control features are the smallest items on the page
Using a tabular format (T-Bar Format) (2) makes it easy to add visuals, highlight safety warnings, etc., as seen in Figure 3.
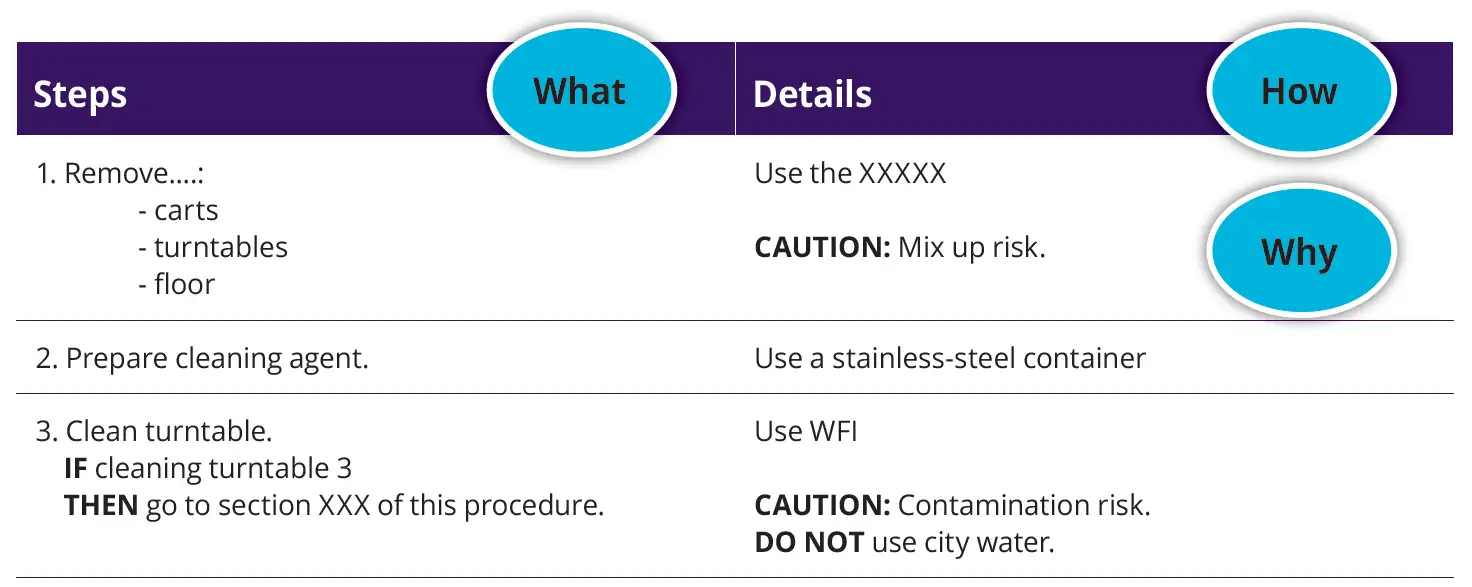
Figure 3. Example of T-Bar Format
While new employees need everything in the procedure (the ‘What, How, and Why’), experienced personnel will just need the ‘What and How’.
Use an Active Voice
Write steps as commands, with one implied action per instruction. For example: Use “turn the switch to number 2” instead of “the switch is now turned to number 2.” Stick to using single sentences rather than paragraphs.
Use transition words to help guide the user:
- Pointing – this, that, these
- Echo links – echo previous thoughts
- Explicit connectives – further, also, therefore
Also, choose positive wording, for example ‘at least’ instead of ‘no fewer than’ to reduce the user’s perception difficulty of the task.
Use multiple, concise action statements instead of long sentences. Bullet lists, rather than a string of commas. Use mixed case if used for words of steps. CAPITALS are action items, critical steps or elements, and should only be used for special cases such as IF, THEN, AUTO, and WARNING.
These are some common conditional statement terms:
- IF – May exist
- WHEN – Expected to occur
- THEN – Promotes consistency
- NOT – Negated condition
- IF NOT – Action when the condition is not met
- AND – Combine actions
- OR – Only one condition must be met
- AND/OR – Complex steps
- SHALL or MUST – For mandatory actions
- SHOULD or COULD – For advisory actions
If using references within the procedure, you will want to avoid excessive branching. Some common references terms are:
- Return to – go back
- Go to – forward
- Refer to – a different document
If the sequence matters, each step should be numbered. If sequence does not matter, bullet lists should be used to remove unnecessary text and numbering. If the sequence is critical to safety or quality, a warning/caution should be included before the steps. Warnings and cautions are NOT numbered steps, Warnings = Safety; Cautions = Quality Risk.
Warnings should look different than cautions, such as using a slightly larger font size. Other things to consider:
- Bold the entire warning or caution statement
- Double-check that the statement includes an action step.
- No more than two warnings per page
- Write END after the last instruction step
Use a unique color, text box, or graphic feature to make sure they standout.
Reading Level
Aim to write procedures so that there is low cognitive load (2). The reading process model descends stepwise with the user’s understanding of the procedure:
- Must recognize characters (letters, numbers, symbols)
- Must recognize words and assign meaning
- Must recognize grammar to understand how words form sentences
- Must draw upon information in their memory to understand
- Must recognize grammar to understand how words form sentences
- Must recognize words and assign meaning
If a user cannot easily understand the procedure, they may decide:
- It is not worth the trouble.
- To devote more cognitive resources attempting to understand.
- To continue to use it without understanding
Remember to give BLUF ‘bottom line up front’ and use words at a lower reading comprehension level, such as ‘turn on’ rather than ‘activate.’ Microsoft Word provides readability statistics, so aim for a Readability Index of 10th grade or less (3). (Note this may be challenging if the required terminology is complex).
Visuals
Use pictures, flowcharts, process diagrams, decision trees, and checklists to augment or replace text. A picture does paint a thousand words! Having some white space helps with cognitive overload. Aim for simplicity and remove clutter. Use visual contrast to enhance reading.
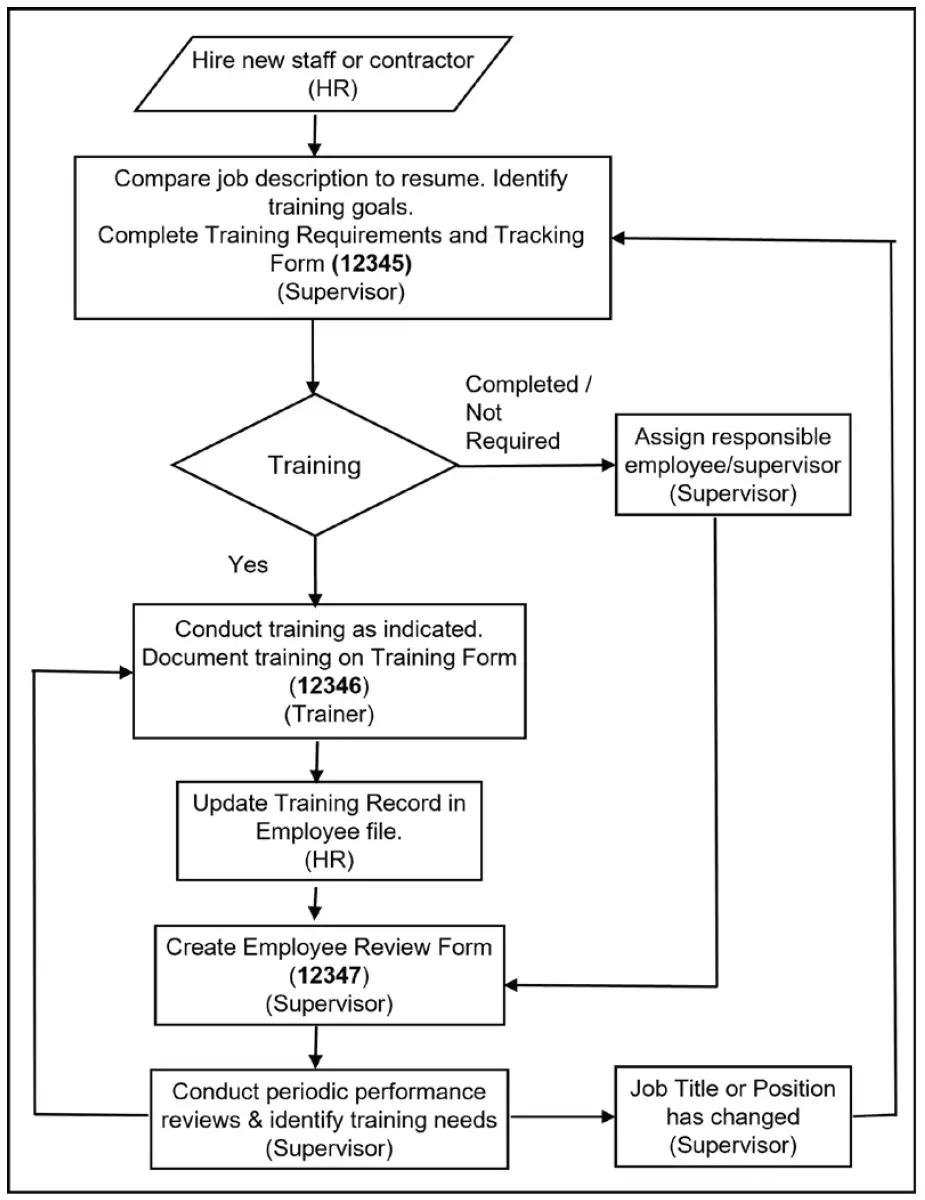
Figure 4. Flow chart example with decision points
Start with a flowchart or process map of process activities and decision points (see Figure 4). Create unambiguous decision trees as needed for decision points. This levels out the criteria and ensures consistency by making decisions the same way.
Use visual examples (pictures/tables/flowcharts/decision trees) where possible and direct people to steps and/or procedures in the diagram.
Responsibilities
If the task must be coordinated between two or more users. Use job roles or departmental titles to call out who is doing which task such as Business Development: writes proposal, then, Project Manager: sends proposal to client. Ensure that responsibilities encompass all involved parties and matches what the procedure says they are doing. Using a cross-functional process map or ‘swim lanes’ format makes this easy (Figure 5).
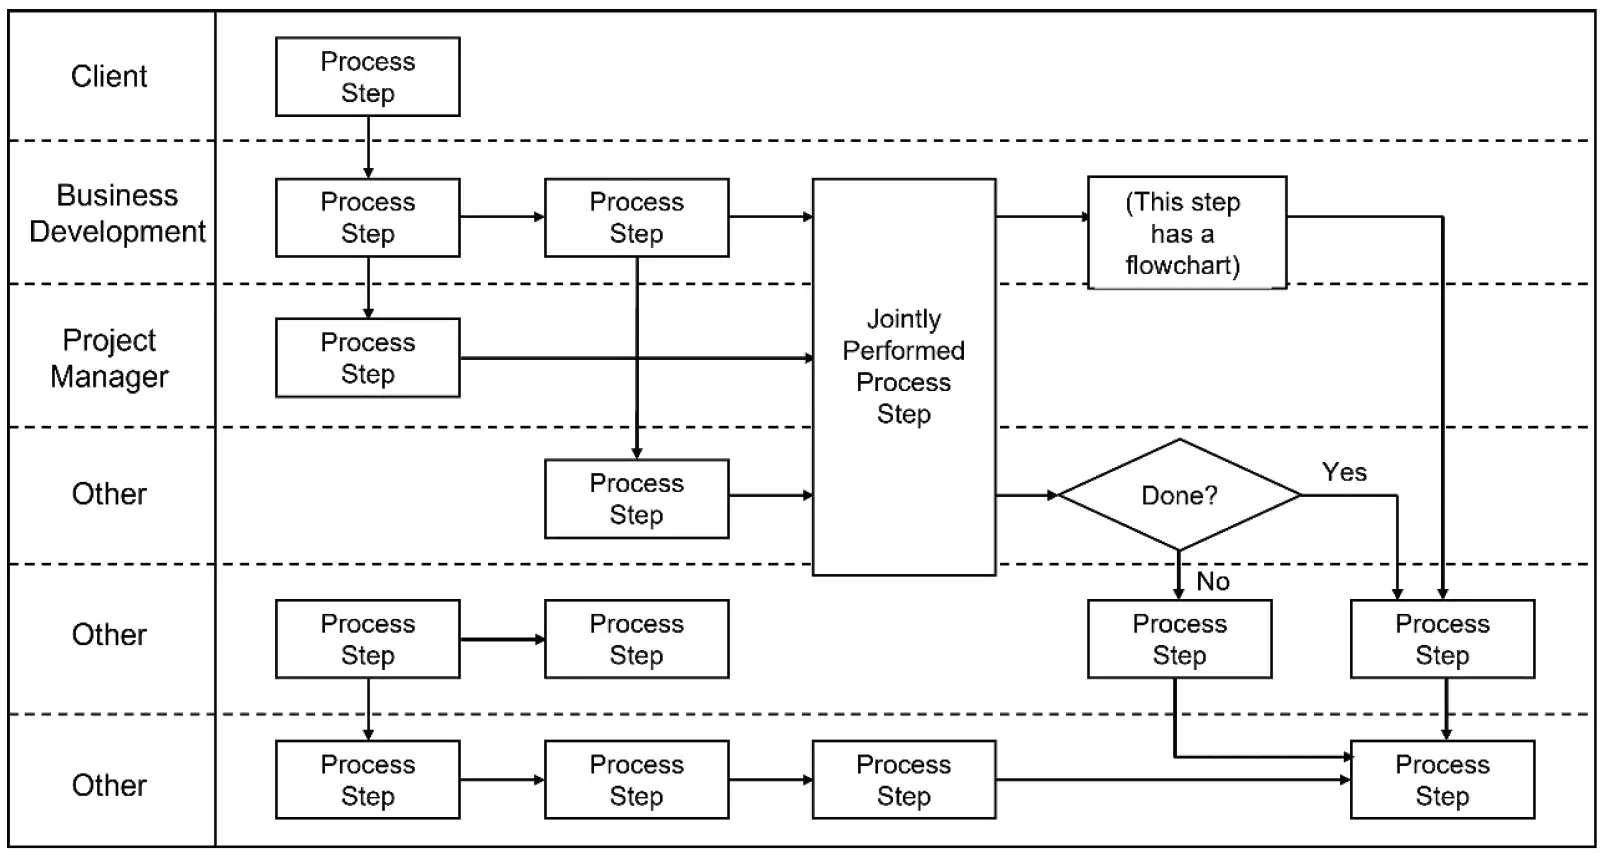
Figure 5. Swim Lane example
You can have a swim lane for each departments’ responsibilities; have a divider between Responsibilities and Procedure, and capture parties as you go, add these to the Responsibilities.
Be specific about who performs what steps in the process. For example, use “The Training Group enters completion information into the LMS” rather than “Enter completion information into the LMS.”
Do not leave instructions open to interpretation: “Use an analytical balance to weigh 10 +/- 0.5 mg” instead of “Weigh approximately 10.23 mg.”
Clarity is important for consistency: “Evaluation of cleanroom personnel’s aseptic technique must be completed on a semi-annual basis.” Who does this evaluation? What does it include? Provide enough detail (who, what and how) to enable and ensure consistent execution of the process or task.
References
Be thoughtful when adding references to your procedure; include appropriate related documents, procedures, and regulations, but don’t reference everything you can think of. It is recommended that you create and maintain a centralized, standard list of definitions and acronyms. Gather definitions from industry standard content first and reference the source.
For example:
Process Qualification: Confirming that the manufacturing process as designed is capable of reproducible commercial manufacturing (Source: FDA Guidance for Industry, “Process Validation: General Principles and Practices”, 2011)
Establish internal definitions if an industry standard is not available and create process/procedure-specific definitions only if necessary. List definitions alphabetically and be consistent with terminology within and across procedures. Consider: The “LMS” versus “the training system” versus “Plateau” – pick one term and stick with it.
Step 5: Revise Draft
It is a good idea to give your work time between writing and editing. Pay attention to paragraph structure. The formula of topic sentence, supporting words, and conclusion still works in a procedure. Place your key information in the main clause, and do not overuse pronouns. If too many pronouns are used, it makes it hard to identify the antecedent, or which ‘him’ or ‘her’ needs to perform the action.
Punctuation and grammar count – in the book “Eats, Shoots & Leaves: The Zero Tolerance Approach to Punctuation,” by Lynne Truss there are many entertaining examples of grammatical mistakes. A statement like, “My favorite things are eating my family and my pets” versus “My favorite things are eating, my family, and my pets” has two very different meanings, depending on where the commas are placed.
While editing, avoid or remove jargon, sports metaphors, cliches, and business speak. Use an active voice and avoid rambling. Never use two words when one will do. Use short words, such as “use” instead of “utilize”.
Ask a co-worker or technical writer to read and review the procedure draft for:
- Verbiage used
- Coherence
- Consistency of terms
- Language
- Format
- Style
You may find it easier to create a reviewer checklist to ensure consistency of proof-reading. Additionally, use SMEs to review the content of the drafted procedure. If the content is not correct, it does not matter how well the document reads. Use the feedback to correct the procedure draft and submit for a second review.
Step 6: Validate
Procedures are intended to enable consistent, repeatable performance of a task or process by trained personnel. Submit the drafted procedure to a field check. Ask at least one person to conduct a dry run for accuracy and completeness and look for directions that are not clear or sufficiently detailed. Do not use experts to validate your draft procedure; they can compensate for deficiencies in procedures, instead use new or less experienced people to try it out.
Have your SME compare the draft version against the real process. Follow the processes step-by-step, or by role to confirm that what is written is correct. Do a full walk-through of the operation to prove that the procedure can be executed as written. Identify and call out important items (safety warnings, data entry and signature areas, notes/common errors, etc.). Identify where visuals (pictures/flowcharts/process diagrams, decision trees) can be used to augment or replace text and assist user through the document.
After this initial walk-through, make sure to include all the users’ recommendations on the drafted procedures. You may want to submit the drafted procedure for another field check before the final release of the procedure. Before you can implement your SOP, you will require QA approval (necessary for regulated environments). While you can use QA as a proof-reader, the procedure should be well-reviewed before submitting for QA approval.
Step 7: Maintain
Remember that SOPs do not substitute for training – you need to consider training requirements (who and how) during the authoring stage. This is why accurate responsibilities are so important. Assign a set of qualified trainers per SOP. Include a training period for users to train prior to the SOP becoming effective. Usually, two weeks is sufficient for a training period. You may want to consider issuing documents on a set day each week, such as Monday night, so people know when to expect changes.
After the SOP is implemented, you will need to monitor the procedure’s effectiveness. The timing period for revision will depend on your internal policies. While common practice is for a revision frequency of two to three years, some processes are so dynamic that they require frequent changes (more than once per year).
The Procedure Owner should drive changes and assess the need for change – no changes are permitted without their knowledge or consent. Consider change management controls and do not piggyback on someone else’s change. They will manage the frequency of revision as required. The Procedure Owner will ensure that all related documents are checked (including training materials – dead references are confusing) and reconcile outdated copies. Remember to include a training assessment in the change process – not at the point of launch.
Well-Written SOPs Protect Product Quality and Survive Regulatory Scrutiny
Standard operating procedures are critical to a medical device manufacturer’s successful operation, and to the quality of their products, processes, and training. For success:
- They must be user-friendly
- They must be accurate
- The process for implementing them must be as easy as possible for all involved
Otherwise, people will not write, follow, maintain – or use – them! Say what you do, do what you say, and document it. A well-written and organized medical device manufacturing SOP will give clear direction and instruction for avoiding deviations and ensure the manufacture of quality products.
Resources
- Secrets to Writing Effective SOPs for Medical Device QMS by Susanne Manz – Compliance4alllearning webinar
- How to Write SOPs that Avoid Human Error by Ginette Collazo – ComplianceOnline webinar
- Authoring and Implementing Standard Operating Procedures (SOPs): Best Practices for Success by Joanna Gallant – LifeScienceLeader webinar
Is Your Medical Device Ready for the FDA’s New Cybersecurity Requirements?
Your SOP Questions, Answered
What is a standard operating procedure in medical device manufacturing?
A standard operating procedure (SOP) is a set of written instructions that documents a routine or repetitive manufacturing activity. Required by ISO 13485 and the FDA, SOPs provide consistent direction for completing tasks to predetermined specifications, forming a core component of any effective quality management system.
Why are poorly written SOPs a compliance risk?
Poorly written SOPs are among the most common causes of FDA warning letter citations. Common deficiencies include incomplete instructions, failure to identify who performs a task, and lack of evidence that procedures have been implemented. Investing in SOP quality upfront reduces the need for costly investigations later.
What sections should every medical device manufacturing SOP include?
At minimum, every SOP should include a title, revision designation, effective date, table of contents, purpose, scope, references, responsibilities, glossary, procedure steps, revision history, and approvals. Materials and equipment, safety information, and visual aids such as flowcharts should be added where the process requires them.
What is a Procedure Owner and why does every SOP need one?
A Procedure Owner is the accountable subject matter expert who defines process inputs and outputs, manages stakeholder communication, sets performance metrics, provides training, and drives revisions. Without a designated owner, SOP updates can stall and regulatory records may fail to reflect actual practice.
How do you validate a new SOP before releasing it?
Validation involves a field check in which new or less experienced personnel attempt to follow the draft procedure step by step. Experts should not be used for this step because they can compensate for gaps in the instructions. The goal is to confirm that the SOP can be executed as written, with all safety warnings and data entry points clearly identified.
How often should manufacturing SOPs be revised?
Revision frequency depends on internal policy and process stability. Common practice calls for review every two to three years, but highly dynamic processes may require more frequent updates. The Procedure Owner drives all changes, and training requirements must be assessed as part of every revision cycle, not at the point of launch.
Alexandra (Sandy) Reid is a former QA/RA Specialist at StarFish Medical. She has a PhD in plant molecular biology, has filed several patents on manufacturing therapeutic proteins in plants, and was a reviewer for Canadian Federal natural sciences and engineering grant applications before joining StarFish. She provides support to StarFish clients in the form of documentation generation, review and general quality and regulatory guidance for medical devices.
Images: Adobe Stock & StarFish Medical
Related Resources

Nigel Syrotuck breaks down REACH SVHC compliance for teams working with material suppliers and compliance questionnaires.

We examine when computational modelling and simulation, or CM&S, genuinely supports medical device simulation strategy and when it becomes a costly detour.

Many teams still underuse CM&S, often bringing it late in device validation, when key decisions have already been made. That approach leaves much of the value of CM&S untapped.

This article traces the Pennes bioheat equation from its 1948 origins to modern multiscale approaches, explaining how engineers select the right level of modelling complexity across device categories.